Duct tape time!
Materials:
~Silver duct tape
~Colored duct tape (purple, red, pink, green, blue.... whatever color you want/can find.)
~Batting tape
Tools:
~Knife
Step One -- The Tip
Snip an approximately two inch long strip of duct tape from the roll, and stick it to the end of the blade sectio of your sword. Percy has a specific way of taping the caps on the sword, and it's used for all four of the caps on the sword, so remember it.
Step Two -- The Blade Pt. 1
For the blade you'll use strips of duct tape that are approximately six inches in length. Start at the tip, taping around the edges of the cap as seen below.
Now you'll duct tape along the blade, working your way downwards towards the crossguard. Percy overlaps the duct tape a little bit, as well.
Accidental wrinkles in the duct tape can also be covered over with duct tape, not just the ones that result from taping the parts of the sword that are at odd angles. In the end, you'll have three layers of duct tape along the blade (not the cap), so you have a little leeway there.
Step Three -- Middle Crossguard
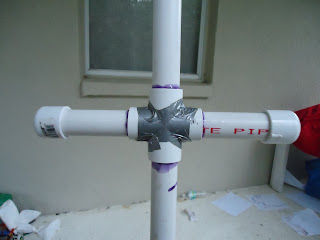
As you can see, Percy gets most of the way down the blade, then pauses to start the crossguard. The crossguard is the part that gets the most wrinkled duct tape because of all the angles. Percy's managed to figure out how to keep the wrinkles to a minimum, as mentioned above, so make sure you follow his advice and duct tape all the angles first so that you can cover as much wrinkled duct tape with the duct tape that will be used on the smoother areas. It's a little difficult to explain, but if you give it a shot, it makes a little more sense.
For the middle of the crossguard, you use two inch strip of duct tape and stick it lengthwise against the center of the four way connector. Press it into all the grooves, then get out your knife. Make a slit in each of the corners. This will make the duct tape lay as flat as possible.
Do this on both the front and the back. Afterwards, use slightly smaller strips to cover the corner sides. You will not cut these.
Step Four -- Blade Pt. 2 and Crossguard
Now at this point you'll finish the rest of the blade, staring beneath the middle section of the crossguard you just did. After that, you'll proceed to duct tape both caps on either side of the crossguard in the same way you duct taped the cap on the tip of the blade.
As you can see, you cap the ends, and also cover the end of the four way connector in duct tape first, and then wrap the middle. The left half of the crossguard is finished, and the right is only missing the final middle strip. See the order there?
Step Five -- The Hilt
Colored duct tape time! Take the color you've chosen and cap the end of the hilt with it. This will be your gem. After that, tape the rest of the way down the hilt with silver.
Percy's Tip: "I find that after a time, the jewel will get partially scraped away, revealing the white PVC pipe underneath. For this reason I like to double the colored duct tape for the jewel."
Obviously, this can be done for all of the caps, if you so wish.

Okay, for the next step, you are going to need the batting tape. If you've ever seen the handle of a baseball bat, you know exactly what you're meant to do. Wind the tape from the gem end of the hilt -- starting right under the cap -- all the way up to the four way connector.
Step Six -- The Blade Pt. 3
Finally! Almost done. This is where those two extra layers of duct tape on the blade come in. Using the silver duct tape, cut a strip that runs the length of the blade, starting beneath the cap on the tip of the blade and running all the way to the four way connector. You'll need four strips -- one for each side, twice. Run it once, then run another strip exactly opposite it. This will cover the blade around as well as along. Then tape the blade again, except this time, tape it so that the crease where the two strips you just taped meet runs along the center of the strips you're putting on.
That's it! You're done.
That's an awful picture, but it was all I had time to take before we came inside. It was beginning to get dark by the time Percy finished, as we started a little late in the afternoon. This sword is called Creator of Worlds, and was crafted by Percy to be given to Siani Delaney, or PenWielder, to the PenKnights.
I still have yet one more post to do on the subject of PVC Pipe swords. Percy has two other types of swords he makes, and also some minor customizations he does during the taping process that I'll include. For now, I'm done.
Dia duit,
~Penny


No comments:
Post a Comment
Hey, thanks for visiting my blog! I love feedback so feel free to leave comment related to the post, or just to say hi. Dia duit!