First of all, they're proving to be extremely durable. Me, Percy, and my other brother, Ben Fletcher, who's younger than both Percy and I, have been dueling with our own respective PVC weapons for a while now. They've held up very well, and believe me, Percy and Ben don't pull punches when it comes to fighting with swords, especially with each other. PVC works far better than wood does because of the slight flexibility that will absorb the shock of impacts and not dent, shatter, or snap. Obviously these things aren't invincible, but we have yet to find out how to break them in combat. If/when we do, I'll be sure to post and say how it happened.
Okay, so here are the tools and materials needed to make a PVC Pipe Broadsword.
Materials:
~One 53" (or more) length of Charlotte Pipe 3/4" PVC
~Four PVC Pipe caps
~One four way connector
~Cement, and cement primer
(You also need silver duct tape, black duct tape, and batting tape, but the process that includes those will be covered in a later post.)
Tools:
~Hack saw
~Measuring tape
~Permanent marker
Step One
Measuring and Marking
The dimensions for a Broadsword are thus:
Blade: 3'
Hilt: 9.5"
Crossguard: 9"
First, measure from one end of the PVC to three feet down its length, and make a mark with the marker. This will be the blade.
Now, starting from the mark you just made, measure out 9.5" for the hilt.
The crossguard is a little trickier to explain. Each half of the crossguard will be 4" in length, so you can either measure four and four, or else measure eight, and just make a mark at the halfway mark, however you want to do it. Now, I'm not that good at math, but I do know that four plus four equels eight and not nine. So why does the dimensions have the crossguard at nine inches? Well, the four way connector used to attach both halves of the crossguard to the rest of the sword adds about an inch. Eight plus one is nine. Aha!
Step Two
Cutting
The next step is easy. Hacksaw! Now, here's a tip from Percy... Do not saw beginning from the middle and working your way down. That will make it much harder for you. Begin from the end, and saw on every line you marked out on the PVC. Don't try to saw the crossguard in half after you've cut it out. Attempt to cut as straight as possible.
Because we do not have a very good hack saw, Percy had to use the wood saw you see pictured in the first photo after starting with the little red pipsqueak pictured here. Another tip? Get a good hack saw.
Step Three
Capping and Priming
Time to stick it all together! Here we have all the pieces that you've cut out, plus the four way connector, and the caps. There's the blade on the far right, then the hilt and the connector, then the caps, and then the two halves of the crossguard.
First of all, put the caps on the end of each of your sword pieces.
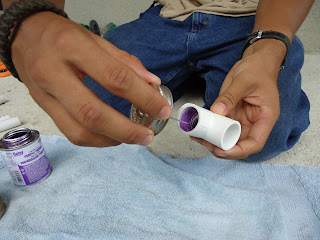
Once you've done that, get your cement primer out and put primer on the inside rim of each hole in the four way connector...
.....and around the outside rim of each of the non-capped ends of the blade, hilt, and crossguard halves.
Step Four
Cementing
Step Five
Waiting
Now you have a lovely almost finished broadsword. This is the end of Pt. 1. The cement holding your new weapon together must be left to set for 24 hrs. Leave it somewhere where your little siblings won't be tempted to give it a go and either whack something important, or pull the sword apart before the cement takes hold. That would be bad. Yeah.
Percy's going to duct tape bind one of my sisters' swords tonight, and I'll take pictures of it, so Pt.2 should be up soon. Forge away!
Dia duit,
~Penny


No comments:
Post a Comment
Hey, thanks for visiting my blog! I love feedback so feel free to leave comment related to the post, or just to say hi. Dia duit!